A hinge on a drawing is a circle. In a film, it can explain why the whole product moves.
That's the useful starting point for turning a blueprint into video: choose one relationship the viewer should understand. An exploded view reveals the parts. A controlled movement shows how they work together. Then a second edit can turn that same movement into a reason to care about the product.
We made both from ARC / 01, an original desk-lamp concept: a 24-second technical explainer and a 15-second commercial. Here is the explainer:
Description / transcript
One joint. A better angle. An exploded view identifies the fixed support, friction washer, moving arm and clamp knob. The arm rotates around a fixed pivot while the support and base remain still. The final scene explains the intended role of clamp pressure and friction.
Give the drawing a question to answer
Start with a readable drawing, its parts list and a sentence describing the mechanism. PDF, SVG or a clean image can work. If you already have a CAD assembly, keep its components: Autodesk's presentation workflow supports component movements and exploded animations directly.
For this example, we drew a simple side elevation and a hinge-stack detail. The question is: how does the arm change angle while the base stays still?
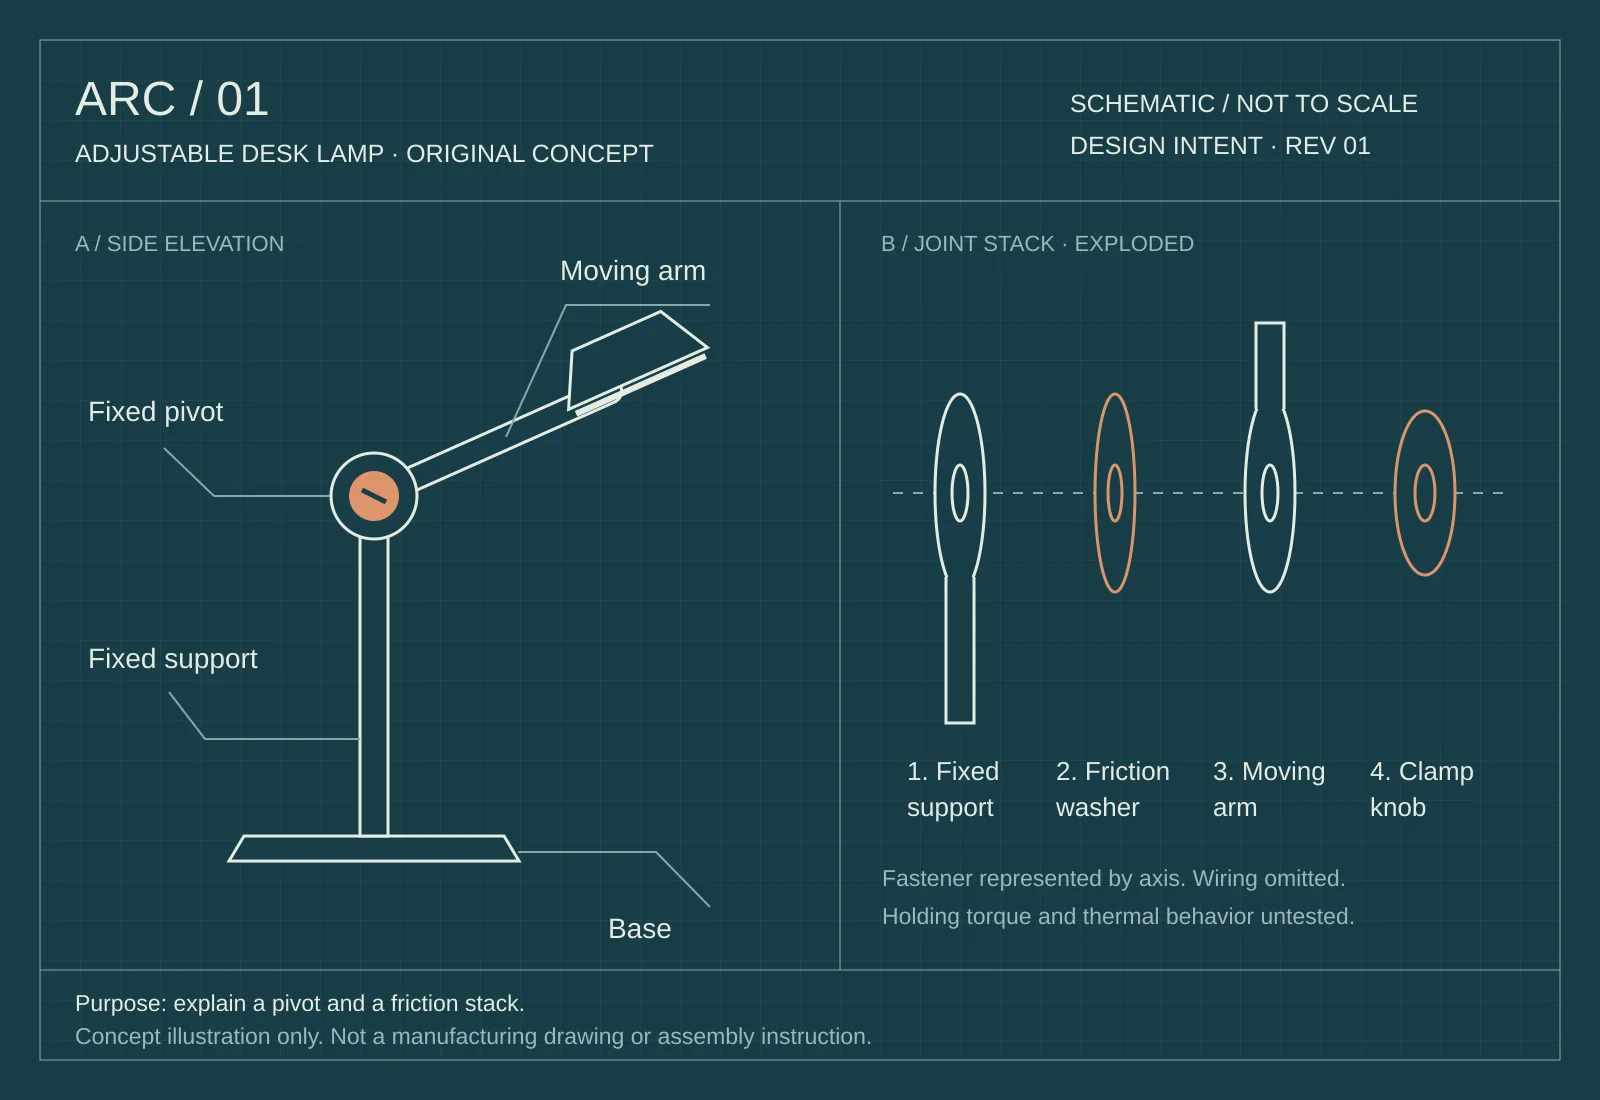
Identify three things before animating: the fixed parts, the moving parts and the pivot or path connecting them. An AI-generated rotation that bends the arm or moves the base may look fluid while explaining the mechanism incorrectly.
The lamp is illustrative. We have not established its holding torque, thermal behavior or manufacturability. Real hinge selection depends on load, operating force and geometry, as Southco's positioning guide explains. Use an approved design when the film needs to make engineering claims.
Ask for an editable explanation
In Voyager, create a project and attach the drawing. Ask for a short storyboard before a finished render:
Turn this drawing into a 24-second technical explainer. First identify the fixed parts, moving parts and joint axis. List anything the drawing does not establish; do not invent dimensions, materials or performance claims.

Build four six-second scenes: show the assembled product and highlight its pivot; separate the joint parts along their shared axis; rotate only the arm around the fixed pivot; return to the assembled product and explain the joint's intended purpose.

Keep the same geometry throughout. Use an editable Remotion project, large readable labels, warm paper, dark teal lines and one orange accent. Show the storyboard and key frames before rendering. The film should work without sound.
Our render uses drawn SVG shapes in Remotion, with frame-based transforms. It is not generated video or a mechanical simulation. The arm and head share one rotation group, so they stay connected. The support lives outside that group and stays planted.
That structure is the important part of the prompt. A motion model can produce an attractive interpretation, but an editable scene gives you direct control over which component moves and where it pivots.
Make the explosion easy to follow
The exploded view has four illustrated elements: fixed support, friction washer, moving arm and clamp knob. Each travels along the same horizontal axis. The spacing exposes their order; it does not show a position the lamp operates in.
Keep labels out of the way during that movement. In our first render, the labels collided while the parts were still close together. We delayed their appearance until the stack had spread apart. We also moved the pivot annotation below the arm's sweep so the arm never crossed its text.
Use a revision prompt that names the defect and the constraint:
In the exploded scene, hide the labels while the parts separate. Reveal them after the spacing settles. Keep the part order and shared axis unchanged. In the rotation scene, place the pivot annotation outside the arm's entire swept area. Render those sections and check the transition frames as well as the final positions.
Those checks matter more than decorative motion. You should be able to pause anywhere and still tell which parts belong together.
Reuse the geometry, change the story
A commercial has a different job. The explainer answers “how does it move?” The commercial should make the light feel worth placing on a desk. We kept the concept's proportions and fixed pivot, then built a Blender interpretation with depth, rounded edges and studio materials. Those material and finish choices are art direction; the drawing does not establish them.
Description / transcript
A close view reveals the copper clamp knob. The warm diffuser illuminates. The arm lowers around the fixed joint, moving its light across the desk. The final view reads Make room for focus. ARC / 01.
Make a separate 15-second product commercial from this lamp concept.
Build an editable Blender scene that preserves the fixed support,
arm proportions and shared arm-and-head pivot. Treat depth, edge
radii and materials as concept styling, not manufacturing facts.

Use deep petrol enamel, a terracotta shade and a copper clamp knob.
Open with a close hinge detail. Cut to the underside as the light
comes on, then show the arm lowering and the light moving onto paper.
Finish with the complete lamp and “Make room for focus.”

Light the actual desk surface. Keep the base planted and the shade
attached through the entire movement. Render camera previews before
the film. Preserve the technical explainer and save the 3D scene.
The two films now use different tools for different jobs: Remotion keeps the explanatory drawing legible; Blender gives the commercial actual surfaces, depth and lighting. The camera can move close to the hinge without substituting a different product. A spot light parented to the moving arm carries the pool of light across the desk as the arm turns.
Review the close-ups as carefully as the wide shot. Our first model let the arm extend across the diffuser; shortening it to the shade rim fixed that intersection. We also moved the paper into the light's actual path. Details like these make a product film convincing without adding extra slogans or decorative transitions.
Keep the source, not just the MP4
Download the blueprint and editable motion project. The bundle contains the SVG input, the unchanged Remotion explainer, the Blender commercial scene and rebuild instructions. Change the drawing and motion code when you need a different product; shortening the exported film alone will not change what it explains.
For a design review, keep the part names and controlled movement. For a landing page or pitch, build the commercial around the product's visible behavior. Both edits work better when they begin with the same clear idea: show the relationship that the still drawing asks the viewer to imagine.
Make your next project in Voyager
Create an account, download Voyager, and start making.