Remotion turns video creation into code, letting AI agents generate editable React-based motion graphics from plain English descriptions. The results can be previewed, refined, and rendered for production. Voyager adds a creative-production layer around this process: its agent, or a connected Claude Code or Codex session, can work with supported creative applications and assets beyond a React composition.
The short version: Remotion is suited to repeatable motion graphics templates, data-driven animations, and programmatic video that can be edited as React components. The five-part prompt structure (context, assets, motion, style, output) helps an agent build a more precise first version. Setup involves creating a project, installing Remotion Skills, and connecting an AI agent.
Key takeaways
- Remotion Skills help AI agents write video code: Install the official skills, describe the composition, and inspect what the agent creates. Remotion Agent Skills do not require a separate MCP server for ordinary project editing.
- A five-part prompt makes production requirements clearer: Specify context, assets, motion, style, and output before asking for a render. Use a video agent brief to define acceptance criteria, then review the result in Remotion Studio.
- Voyager connects the wider creative workflow: Its agent works with Remotion and supported creative applications, while MCP connections and app-specific tools can extend supported tasks. A published Voyager Remotion test documents one agent-assisted workflow.
Voyager can coordinate that code-based work through creative-app integrations for video editing, motion design, and audio production when a project needs more than a React render. Remotion's Free License covers eligible individuals and organizations of up to three people, including commercial use; external applications and model generation have separate costs.
This guide provides copy-paste Remotion prompts, setup instructions, and practical handoffs for editable video projects. These handoffs connect to the wider role of AI agent harnesses in creative production.
Sources: Remotion Agent Skills, coding-agent setup, rendering documentation, and licensing, read on 17 November 2026. Voyager, the desktop app our team builds, supports Remotion and the creative-app workflows described here.
What Remotion Skills enable
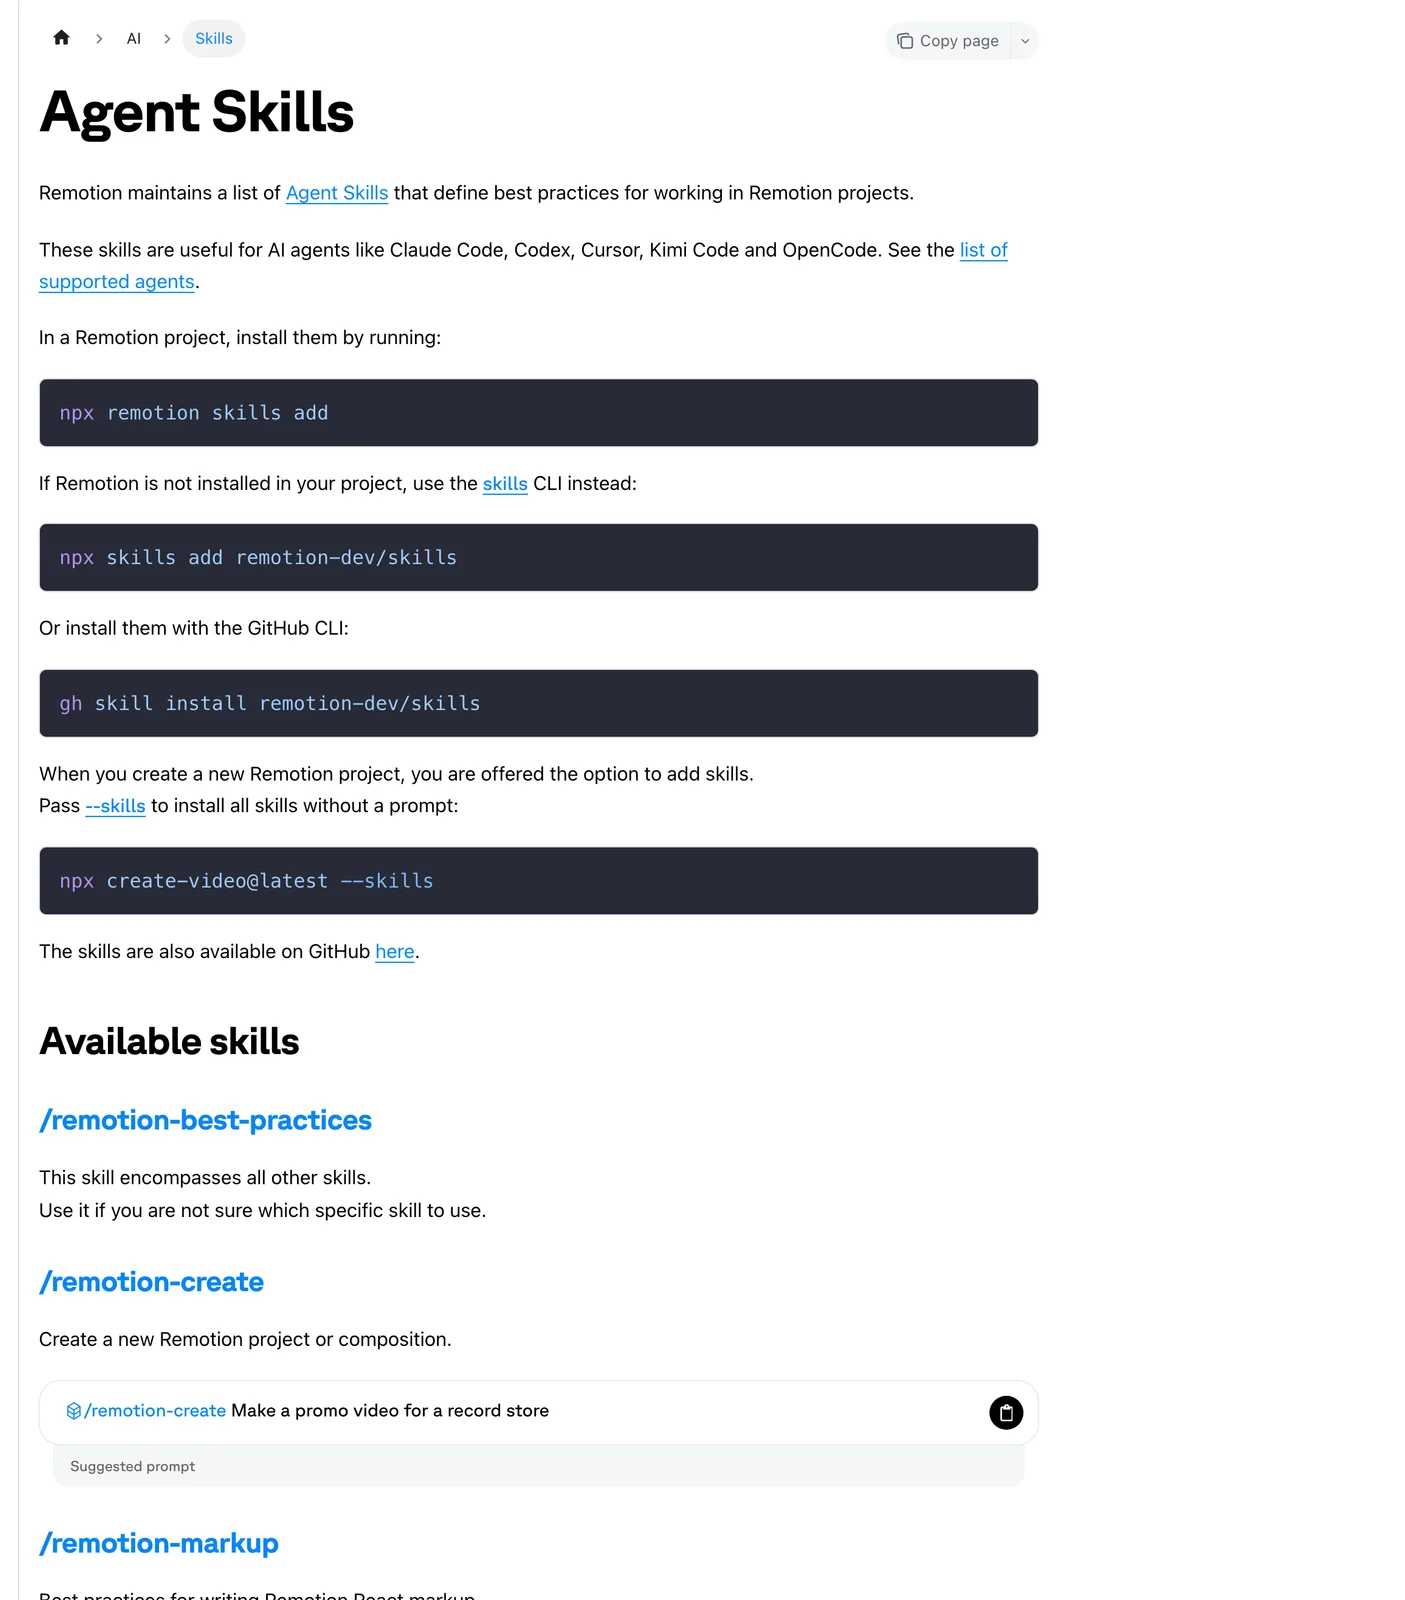
Remotion Skills extend AI coding agents with specialized instructions for video production. When you install the skills package, an agent can use project creation, animation, preview, documentation, and render workflows instead of guessing Remotion conventions.
The official skills repository includes these primary capabilities:
- /remotion-create: Initialize projects and compositions
- /remotion-markup: Write animations, layouts, and typography
- /remotion-studio: Launch the browser-based preview server
- /remotion-render: Invoke local or cloud rendering
- /remotion-maps: Create map animations using map data
- /remotion-captions: Work with transcriptions and subtitles
- /remotion-docs: Search Remotion documentation
The skills work with compatible coding agents, including Claude Code and Codex, which Voyager can also use. The agent writes React code and Remotion renders it into video files. Remotion's older documentation MCP was shut down on October 26, 2026 in favor of Agent Skills; that is separate from the MCP connections Voyager can use for other supported applications.
Setting up Remotion Skills for AI agents
Setup time depends on your environment and familiarity with Node.js. Remotion's core documentation specifies Node.js 16 or newer, although some templates and tools require newer versions. You also need a compatible agent and permission to read and modify the local project.
Installation steps
Step 1: Verify Node.js installation
Open your terminal and run node --version. If you see a version below 16, update Node.js before proceeding. Check the selected template's requirements as well.
Step 2: Create a project
Initialize a new Remotion project:
npx create-video@latest --yes --blank my-video
cd my-video
npm install
Step 3: Install Remotion Skills
From inside the project directory, install the official skills and launch the preview:
npx remotion skills add
npm run dev
Remotion Studio normally opens at localhost:3000, where you can inspect the available composition.
Step 4: Start your agent
Open the project in Voyager to work with its agent or a connected Claude Code or Codex runtime. A standalone coding-agent session is also possible: for Claude Code, run claude in a separate terminal and begin describing videos. Voyager's supported creative-app tools and MCP servers are configured separately from Remotion Skills.
Verification checklist
Before writing your first prompt, confirm:
- Remotion Studio opens in your browser and displays the project
- Your agent can read the project and create a simple text animation
- .agents/skills/remotion-best-practices/SKILL.md exists; Remotion also provides Claude Code compatibility through .claude/skills
If skills are not recognized, re-run npx remotion skills add in the project, confirm the installation directory, and restart the agent.
The 5-part prompt formula
A practical way to write Remotion prompts is to organize instructions into five parts: context, assets, motion, style, and output requirements. This structure communicates the intended composition clearly, although results still need previewing and refinement.
1. Context: Tell the agent what framework and practices to use.
Example:
Use Remotion best practices and React components.
2. Asset: Specify images, videos, data files, or local paths the composition should use.
Example:
Import the logo from public/logo.png and the product image from public/product.jpg.
3. Motion: Describe animations, timing, and transitions.
Example:
Zoom in slowly over 2 seconds, then hold for 1 second, then fade out.
4. Style: Define colors, fonts, spacing, and visual treatment.
Example:
Use Inter font, indigo #6366f1 for headings, white background, minimal design with generous padding.
5. Output: Specify format, resolution, duration, and frame rate.
Example:
Render as 1080p MP4, 30fps, 15 seconds total duration.
Complete prompt example
Here is a full prompt combining all five parts:
Use Remotion best practices.

Import the company logo from public/logo.svg.

Create a 10-second animated intro:
- Logo starts centered and small (50% scale)
- Zoom to 100% over frames 0-45 using spring animation
- Hold at full size for 3 seconds
- Fade out over the final second

Style: Dark background (#0f172a), logo should glow with subtle shadow.

Output: 1920x1080 at 30fps, 10 seconds (300 frames), ProRes 4444 with the specified dark background. No alpha channel is required.
Specific frame numbers make timing instructions less ambiguous than phrases such as "during the first second." Preview the animation to check whether the rhythm and transitions fit the intended result.
Copy-paste Remotion prompts for video tasks
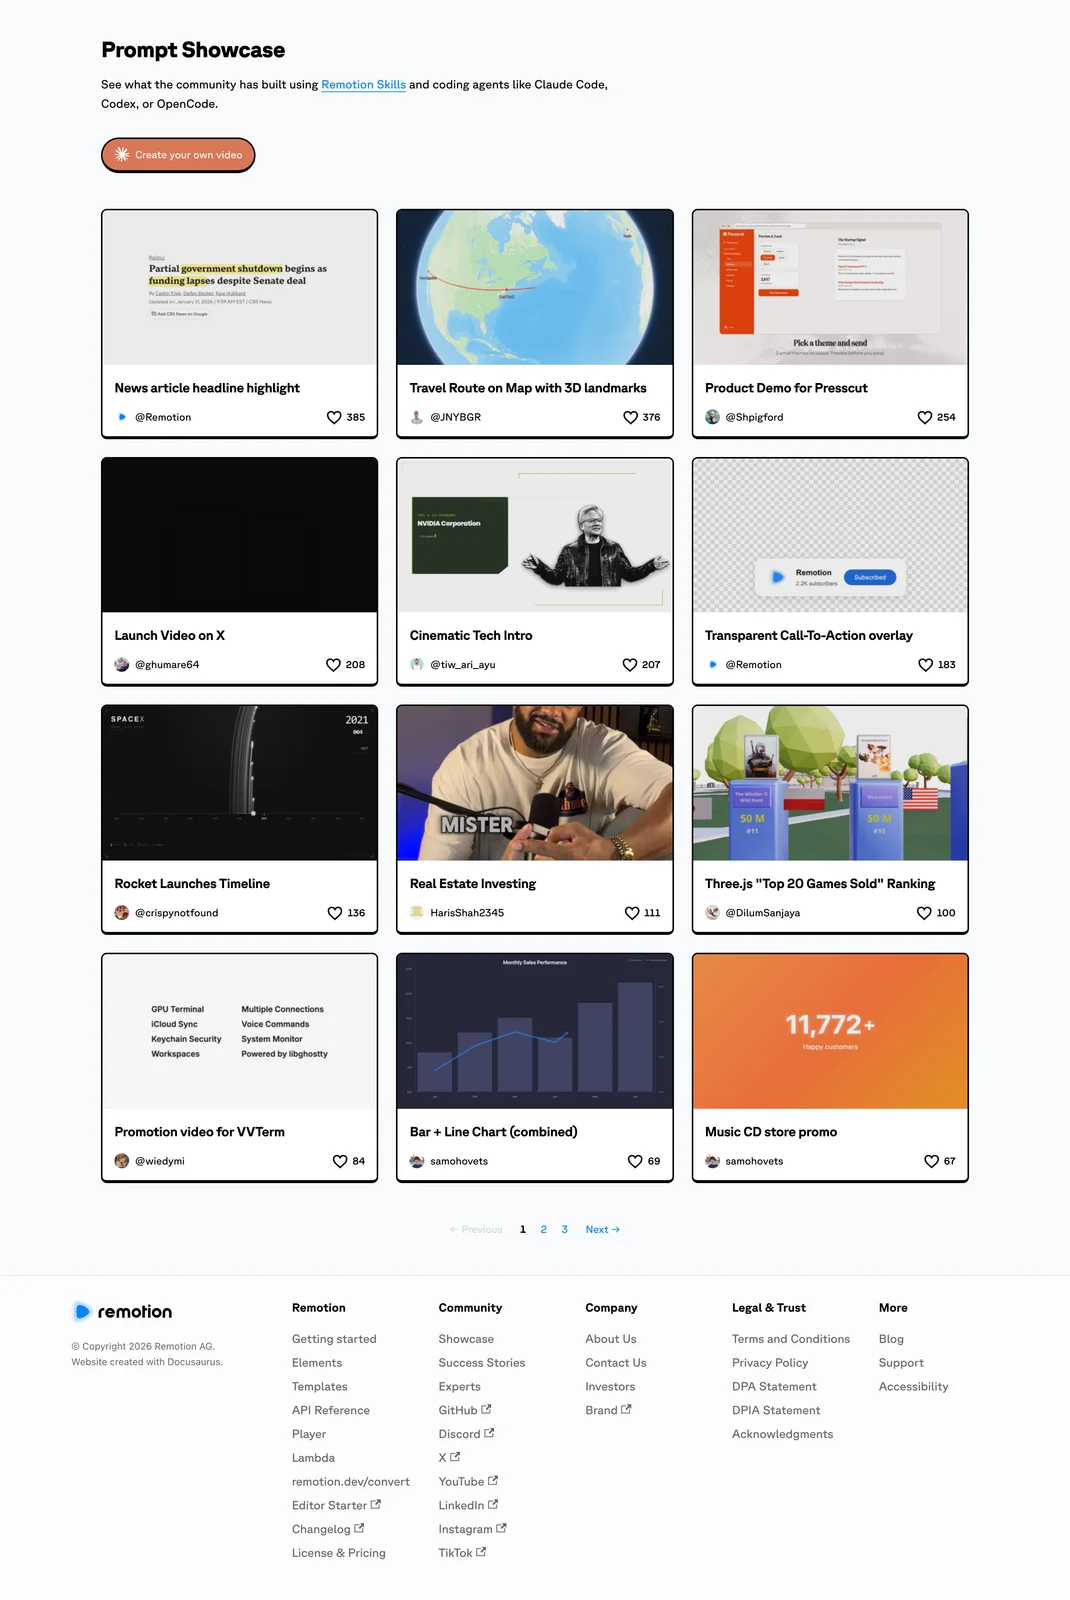
These prompts can be used with Voyager's agent or compatible coding agents. Replace the example asset paths, colors, and timing with your project details. The feature tutorial and real UI product video workflows illustrate how approved assets and recorded interfaces shape production. The prompts describe intended outputs; they are not claims that the examples have been independently rendered for this article.
Motion graphics and data prompts
Animated logo reveal
Reusable composition and revision techniques also support motion-design workflows.
Use Remotion best practices.

Create a logo reveal animation:
- Import logo from public/logo.svg
- Start with logo invisible and 20% below final position
- Animate up and fade in over frames 0-30 using spring physics
- Add subtle particle effects behind the logo during reveal
- Hold final position for 2 seconds

Style: Transparent background, add soft white glow around logo edges.

Output: 1920x1080 at 30fps, 5 seconds (150 frames), with a transparent background. Render using the `prores` codec, `4444` profile, PNG frame format, and `yuva444p10le` pixel format to preserve the alpha channel. Verify transparency in the final export.
Data-driven stat card
Keep the underlying data and project editable so metrics can be updated without recreating the visual. That handoff matters when delivering editable video projects.
Use Remotion best practices.

Create an animated statistics card that accepts these props:
- metricName (string)
- metricValue (number)
- percentChange (number, can be negative)
- comparisonPeriod (string)

Animation sequence:
- Card slides in from bottom over frames 0-20
- Metric value counts up from 0 to final value over frames 20-60
- Percent change badge fades in at frame 50

Style: White card with rounded corners (12px), Inter font,
metric value in 48pt bold, positive changes in green #22c55e,
negative in red #ef4444.

Output: 1080x1080, 30fps, 3 seconds (90 frames), MP4.
Social media lower third
Use Remotion best practices.

Create a lower-third name card that accepts these props:
- name (string)
- title (string)
- company (string)

Animation:
- Accent bar slides in from left edge over frames 0-15
- Name text types in character by character from frames 15-35
- Title and company fade in together at frame 40
- Entire element holds until frame 120, then slides out left

Style: Semi-transparent dark background (#000000 at 80% opacity),
white text, accent bar in brand color #6366f1,
Roboto font for name (bold), Roboto Light for title/company.

Output: 1920x1080 at 30fps, 5 seconds (150 frames, numbered 0-149). Render a transparent PNG sequence using Remotion's `--sequence --image-format=png` options. Keep the composition background transparent, ensure the lower-third entrance and exit animations fit within the frame range, and verify that the exported PNGs retain their alpha channel.
Animated chart from data
Use Remotion best practices.

Create a bar chart animation that reads data from public/data.json.

Expected JSON structure:
[
  {"label": "Q1", "value": 45},
  {"label": "Q2", "value": 62},
  {"label": "Q3", "value": 78},
  {"label": "Q4", "value": 91}
]

Animation:
- Y-axis and labels appear first (frames 0-15)
- Each bar grows from zero to its value sequentially
- 10-frame delay between each bar starting
- Value labels fade in above each bar after it finishes growing

Style: Light gray background #f8fafc, bars in gradient from
#6366f1 to #8b5cf6, Inter font for all text, subtle grid lines.

Output: 1920x1080, 30fps, 4 seconds (120 frames), MP4.
Product videos and campaign prompts
Product demo with screen recording
Use a genuine screen recording rather than invented interface states. That keeps real UI product videos grounded in actual interface states.
Use Remotion best practices.

Create a product demo video that:
- Imports screen recording from public/demo.mp4
- Places it in a realistic browser mockup frame
- Adds animated cursor highlights at specified timestamps

Timestamps for cursor highlights:
- 0:02 - highlight the "Create New" button
- 0:05 - highlight the settings panel
- 0:08 - highlight the export button

Add subtle zoom (105%) to the highlighted area during each highlight.

Style: Minimal browser chrome, soft shadow under the frame,
highlight circles in yellow #fbbf24 with pulse animation.

Output: Match source video duration and resolution, MP4.
Product promo with Voyager assets
For campaigns involving generated imagery, voice, or video, prepare approved assets first. Voyager can work with external media models, but a prompt should not silently spend credits or invent missing source files.
Use Voyager's agent and Remotion best practices.

Create a 15-second 1920x1080 product promo at 30fps.
- Check public/ for logo.svg, product.png, and voiceover.wav
- List any missing assets before editing or generating anything
- Ask for approval before using a paid media model
- Build a Remotion composition with an opening title, a product close-up,
  three feature callouts, and a final logo card
- Keep text, colors, timing, and assets editable in the project
- Make the voiceover and titles align without covering the product

Style: Use the supplied brand colors and typography; do not invent them.

Output: Render an MP4 and preserve the source project and asset paths.
Report any asset, timing, or render limitations.
Captioned feature tutorial with voiceover
For software walkthroughs, start with real screenshots and an approved script. In a feature tutorial video, narration, captions, and interface steps need to stay synchronized.
Use Voyager's agent and Remotion best practices.

Create a 30-second feature tutorial at 1080x1920 and 30fps.
- Read public/script.md and use public/voiceover.wav if present
- Use only approved screenshots in public/screens/
- Show one on-screen instruction for each documented feature step
- Add an animated cursor only at coordinates verified against the screenshots
- Time captions to the supplied narration; flag missing transcripts or audio
- Keep captions within mobile-safe margins and clear of important UI labels
- Save editable text, timing, and layout components in the Remotion project

Output: MP4 plus the source project. Show a preview before rendering.
Do not invent product buttons, feature names, or screen states.
Multi-format social campaign variations
Reusable compositions make it easier to adapt one campaign for multiple placements. A clear video agent brief defines required formats and review criteria before production.
Use Voyager's agent and Remotion best practices.

Create three versions of a 12-second product announcement:
- Landscape: 1920x1080, 30fps
- Vertical: 1080x1920, 30fps
- Square: 1080x1080, 30fps
- Use the same approved logo, product image, copy, and brand constants
- Make layout respond to each aspect ratio rather than stretching assets
- Keep all text editable and inside safe margins
- Reuse the same motion timings unless a format needs an explicit adjustment
- Register a separate composition for each output format

Output: Three MP4 files and one editable Remotion source project.
Preview every aspect ratio and report any cropping or readability issues.
Creative-app handoff prompts
Editable overlay for a video editor
This prompt makes the handoff explicit. A rendered overlay can be imported into a supported editing application, but it is not the same as an editable Remotion composition or a native editor project.
Use Voyager's agent and Remotion best practices.

Create a 5-second animated title overlay at 1920x1080 and 30fps.
- Use a supplied brand font and logo from public/
- Keep the text and motion as editable Remotion components
- Animate the title in over 20 frames and out over the final 20 frames
- Preview the overlay against a sample background
- Export a transparent ProRes 4444 overlay using PNG frames and verify its alpha channel
- Save the Remotion project and note the output file's exact path

If a supported Premiere Pro or DaVinci Resolve workflow is configured,
prepare the overlay for import. Do not claim the editor timeline was
modified unless the change is completed and verified.
Technical explainer from a Blender render
This combines a 3D asset with code-based labels and timing. A drawing-to-video explainer demonstrates a Remotion and Blender production route. When the 3D and the labels should come from one scene, vork, the research-preview engine our team builds, renders 2D text and ray-traced 3D together.
Use Voyager's agent and Remotion best practices.

Build a 20-second, 1920x1080 technical explainer at 30fps.
- Check public/ for an approved Blender render or turntable.mp4
- Import the rendered footage without changing the source geometry
- Create three labeled steps: overview, key component, and motion
- Add leader lines anchored to specified on-screen coordinates
- Keep labels as editable React text and shapes
- Use precise frame-based transitions and a consistent camera crop
- Flag any unverified dimensions, materials, or mechanical claims

Output: MP4 and editable Remotion project with a list of source assets.
If a Blender revision is needed, propose it as a separate app task.
After Effects overlay handoff
Voyager can coordinate Remotion motion graphics with supported After Effects workflows. Supported After Effects MCP workflows offer different ways an agent may interact with a composition.
Use Voyager's agent and Remotion best practices.

Create a six-second transparent title animation at 1920x1080, 30fps.
- Import approved brand assets from public/
- Animate the title and subtitle on separate React layers
- Keep the background fully transparent
- Use frame-based easing and check the first and last frames
- Export ProRes 4444 with an alpha channel using verified render settings
- Save the editable Remotion source and record the rendered file path
- If an After Effects bridge is configured, prepare an import handoff
- Confirm actual changes in After Effects before reporting completion

Output: Transparent overlay, project source, and a handoff note.
Do not describe the rendered overlay as native editable After Effects layers.
Branded product card from Photoshop assets
Keep layered artwork as the design master while Remotion handles animation. Supported Photoshop MCP workflows include document and layer operations.
Use Voyager's agent and Remotion best practices.

Create an eight-second product card at 1080x1080, 30fps.
- Check public/ for product.png, logo.svg, and approved-copy.txt
- If artwork exists only as a PSD, request an approved PNG export
- Do not overwrite or flatten the original layered PSD
- Animate the product image, heading, benefit, and end card independently
- Keep all Remotion text and timing editable
- Use the supplied brand colors, fonts, and safe areas
- Preview frame 0, midpoint, and final frame before rendering

Output: MP4, editable Remotion project, and asset manifest.
Note any requested Photoshop changes as separate verified operations.
Advanced prompting strategies
Beyond individual prompts, reusable conventions and targeted revisions make agent-produced compositions easier to maintain.
Building reusable brand constants
Ask your agent to create a shared constants file at the start of a project:
Create a file at src/brand.ts that exports:
- COLORS object with primary (#6366f1), secondary (#8b5cf6),
  background (#0f172a), text (#f8fafc), accent (#22c55e)
- FONTS object with heading ("Inter"), body ("Roboto")
- TIMING object with standardSpring, fadeIn, fadeOut easing configs
- SIZES object with common padding, margin, and border-radius values

All components in this project should import from this file.
This approach keeps brand settings consistent across compositions and makes global changes simpler.
Iterative refinement
For iterative refinement, use this workflow:
-
Start with a simple version of your concept
-
Preview in Remotion Studio and identify one thing to change
-
Give specific feedback like
Promptmove the text 20 pixels lowerrather than vague requests
-
Commit working versions to Git before attempting major changes
The time needed to create a working first version depends on project complexity, available assets, and familiarity with Remotion. Once a composition is working, its React components can be reused and refined for subsequent variations.
Batch rendering with data
For personalized videos at scale, create a template that accepts JSON data:
Modify the YearInReview composition to accept a data prop with:
- userName (string)
- totalMinutes (number)
- topArtists (array of 5 strings)
- topGenres (array of 3 strings)
- memberSince (date string)

The composition should display this data in the existing animation
sequence, personalizing text and chart values for each user.
You can render personalized variations by registering the composition, supplying different JSON props through Remotion's rendering API or CLI, and generating an output for each dataset. For large batches, configure rendering infrastructure, validate inputs, and account for cloud-compute costs. Organizations that do not qualify for Remotion's Free License may need a Company License with the appropriate rendering option.
Voyager app integrations and MCP workflows
Voyager connects Remotion's editable React compositions with the wider creative-production process. Its agent, or a connected Claude Code or Codex session, can work with supported creative applications, local project files, external generation models, and configured MCP connections. Available integration methods differ across Voyager's supported creative apps.
- Remotion production: Build, preview, revise, and render code-based motion graphics while retaining the source project. Remotion Agent Skills provide the code-side workflow
- Premiere Pro editing: Prepare rendered overlays and supporting media for an editable video timeline, using supported app control or imports. Compatible Premiere Pro MCP connections depend on the installed bridge
- After Effects motion: Coordinate compositing and animation revisions in a supported After Effects project. Supported After Effects MCP approaches include scripting and app bridges
- DaVinci Resolve finishing: Use compatible project handoffs and supported automation for timeline work, color, and finishing. Resolve MCP connections have edition and version requirements
- Blender and 3D assets: Work with supported Blender scene workflows and bring exported visual assets into a Remotion composition. Blender MCP bridges support app-specific operations
- Design and branded assets: Prepare graphics through supported Photoshop workflows or Voyager Design, then animate approved exports in Remotion. Photoshop MCP connections support document-level workflows
- MCP and reusable skills: Configure supported servers in Settings > Integrations and apply reusable creative skills across tasks. Voyager's harness architecture connects the agent and production layers
- Built-in finishing tools: Use Voyager Video, Design, and DAW for supported timeline, graphic, and audio tasks without leaving the wider Voyager environment; keep appropriate editable sources alongside final renders
A practical project can combine a Remotion title, generated or recorded media, a Blender visual, and a professional editor handoff. Voyager connects these stages while keeping the relevant source files available for further revisions. Preserving editable video projects also means recording which layers and source files survive each handoff.
Troubleshooting common issues
When prompts do not produce expected results, check these common project and rendering issues:
Agent and project setup
Skills not recognized by agent
Re-run npx remotion skills add from inside the project directory and restart the agent. Verify .agents/skills/remotion-best-practices/SKILL.md and, for Claude Code, the .claude/skills compatibility path.
Preview server crashes with TypeScript errors
Copy the full error message and paste it back to the agent with
fix this error.
Review the changes and try the preview again.
Compositions do not appear in Studio
Check src/Root.tsx to ensure your composition is registered. Ask the agent:
Register [CompositionName] in Root.tsx with the correct duration and dimensions.
Assets not loading
Move files to the public/ folder and reference them with staticFile('filename.png') instead of unsupported relative paths.
Animation and render consistency
Jittery or inconsistent animations
Animations that use Math.random() can produce inconsistent results across render workers. Ask your agent to
replace Math.random() with Remotion's seeded random() function, using stable seeds.
Compositions render differently than preview
This can indicate unseeded random values, time-based calculations, or differences in loaded assets. Request frame-based animations and verify that assets, fonts, and dependencies remain consistent.
Cost considerations
Remotion licensing, agent access, media generation, and rendering are separate cost layers. Evaluate each before scaling a workflow.
License tiers
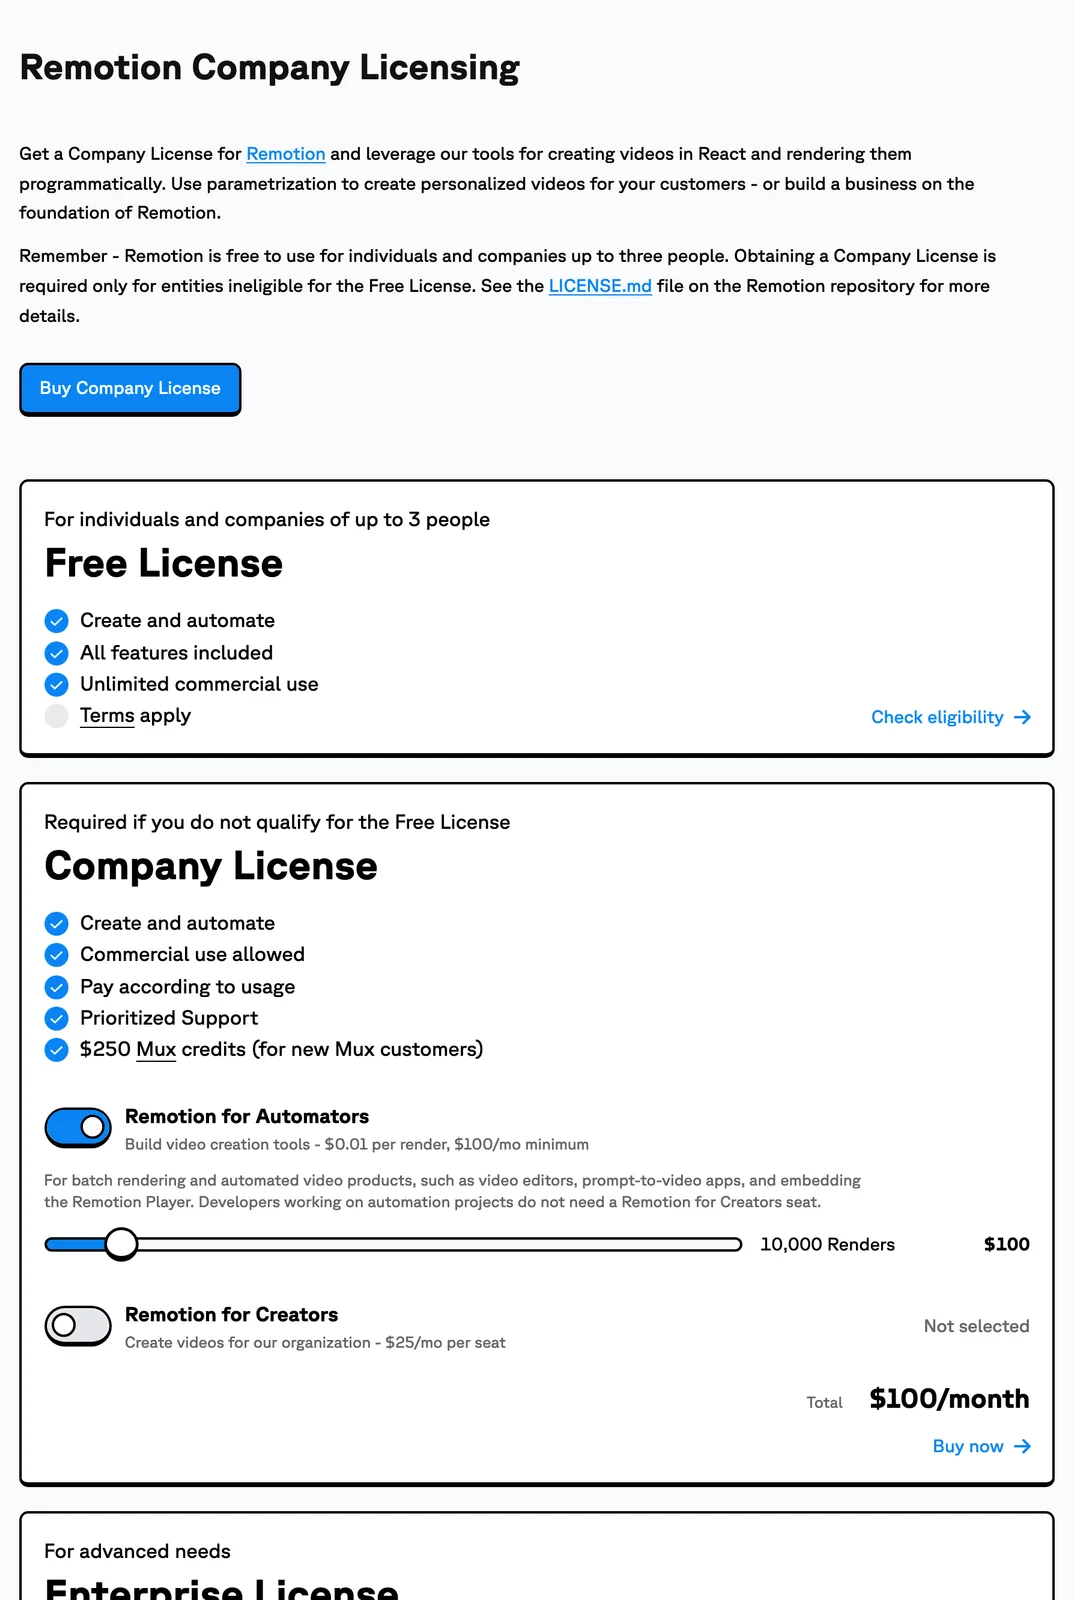
Remotion's licensing depends on organizational eligibility and use. Individuals and eligible small organizations can use the Free License, while organizations requiring a Company License use creator-seat or automated-render options. According to the official licensing page, checked on 17 November 2026 (prices in US dollars):
- Free: All features for eligible individuals and organizations of up to three people, including commercial use
- Remotion for Creators: $25 per active creator seat per month for organizations requiring a Company License
- Remotion for Automators: $0.01 per render with a $100 per month minimum (10,000 renders)
- Enterprise: Starting at $500 per month with additional support and terms
Free commercial use depends on eligibility, and automation licensing is distinct from a creator-seat subscription. Check the applicable terms before production use.
Infrastructure costs
Rendering happens on infrastructure you operate or provision, not as an unlimited Remotion-hosted service. Local rendering uses your own hardware. For cloud rendering on AWS Lambda, charges depend on runtime and configuration.
Remotion's Lambda cost examples, read on 17 November 2026, show that costs vary by composition, resolution, AWS region, memory allocation, and other settings. One documented 10-minute HD example costs approximately $0.103 to $0.108 in Lambda compute, but that is an example, not a universal rate. Bandwidth, storage, logging, and applicable Remotion licensing may add costs.
Comparison to traditional production
Reusable Remotion templates can reduce repeated assembly work after a composition has been created and validated. The total cost still depends on the complexity of the video, development and review time, AI agent subscriptions, rendering infrastructure, and licensing for the applications involved.
For recurring animated reports, product demos, and personalized clips, compare the cost of maintaining a reusable composition with the cost of making each variation manually. Voyager's app connections can add useful editing and finishing options, but those handoffs must be evaluated for the actual project, not assumed to produce a fixed time saving.
Where code-based video fits
Remotion is useful for video jobs where elements can be defined as components and revised through code. Voyager becomes relevant when a production also calls for supported creative-app operations, generated media, or editable handoffs outside the React project. Different video and audio agents operate at different stages of production.
Good fit:
- Motion graphics and animated explainers
- Data visualizations and charts
- Personalized video templates (year-in-review, reports)
- Product demos with screen recordings
- Social media graphics at scale
- Videos that need frequent updates
Less suited:
- Photorealistic footage of people or landscapes without source media
- One-off creative videos where a code template adds unnecessary setup
- Teams with no one comfortable reviewing code (even AI-generated code)
Generative footage models can provide source clips for these workflows, while Remotion handles composition and timing. A timeline editor remains valuable when a project requires hands-on cutting, detailed finishing, or revisions to assets that are not represented as React components.
Final verdict: why Voyager fits creative video production
Voyager brings Remotion prompting into a connected creative workflow that extends from planning and generating assets to motion design, timeline editing, audio, and delivery. Its agent can build editable Remotion compositions while using supported app integrations and MCP connections to coordinate related work in Premiere Pro, After Effects, DaVinci Resolve, Blender, and other creative tools. That combination gives creative teams a practical way to preserve revisable project files and keep production stages connected. A published Voyager Remotion test demonstrates one end-to-end example, while motion-design automation connects the same approach to wider creative-app workflows.
Frequently asked questions
Do I need to know React to use Remotion with AI agents?
No coding knowledge is required to get started. The AI agent writes the React code for you based on your natural language descriptions. However, understanding code helps with troubleshooting when the agent produces errors. Remotion documentation notes that debugging may require React knowledge for complex projects.
How long does it take to create a video from a prompt?
The time required depends on the complexity of your composition, available assets, and familiarity with Remotion. A simple text animation may be quicker to build than a multi-scene product demo with custom assets and transitions. Once you have a working template, you can reuse its components and update text, data, or styling without rebuilding the entire project.
Can I use Remotion commercially for free?
Yes. The free license allows unlimited commercial use for eligible individuals and organizations with up to three people. Larger organizations need a Company License, with $25 monthly creator seats or per-render licensing.
What is the difference between Remotion and generative AI video tools?
Remotion creates programmatic video compositions using editable React components. With consistent assets and frame-based animation, it can produce repeatable renders. Generative AI models instead create or transform footage, including prompt-based changes to existing clips. Unlike a Remotion composition, generated footage generally does not expose each visual element as editable React code. Remotion supports reusable templates, data visualizations, and motion graphics, while footage can be incorporated into editable video projects.
How do I render thousands of personalized videos?
Create a Remotion composition that accepts data props (user name, metrics, etc.), then use a Node.js script to loop through your data and call the Remotion render API. AWS Lambda can parallelize renders, while Remotion Agent Skills support project editing.
Voyager is a desktop AI agent for creative work
Describe what you want to make; Voyager plans it, uses your apps and tools, and keeps everything editable.